When you are buying a home, you want to get as much livable space as possible. Finishing your attic is a great way to add some livable space for a master bedroom, a guest suite, or even a bonus room for a large family.
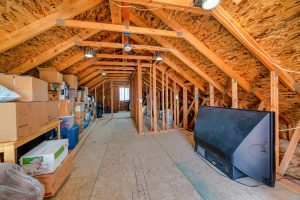
Unfinished spaces are sometimes used for storage or just left empty, which means the walls and floors aren’t finished. If there are floors, they usually aren’t well taken care of or made out of materials you’d want to put furniture and people on top of. You have to be careful about putting weight on subfloors or the floors that exist in your attic. There are a few different things to think about when finishing your attic by adding flooring, including how much work you will need to do before you even put your flooring in.
So, let’s take a look at how finishing your attic with flooring can be a game-changer!
First Up: Can You Really Finish Your Attic by Adding Flooring?
One thing you need to determine is whether or not you can just add flooring to your attic. Remember that your floors support a ton of weight. Newer homes tend to have subflooring in the attic that will hold the weight of furniture and people, but older homes may not. The joists need to support the weight of flooring and people, not just the drywall that is already there.
To figure this out, you will have to look at the joists on your floor:
● Joists that are 2x6s or 2x8s are not strong enough to support floors with people, furniture, and added weight.
● If the joists are larger, they might be able to support attic flooring. The bigger the joists are, the better that they will be at supporting weight.
● If you aren’t sure, it is best to have a professional take a look at your space.
The other thing you may want to look at is the spacing between the joists. The less spacing there is, the better you will be. You want to have a spacing of 16 inches or less between the joists. Anything over that will create problems, and it is a hint that you shouldn’t use flooring here.
If you figure out that your existing flooring isn’t going to work with a conversion, you need to first add additional support to the flooring before you can finish your attic with flooring.
Add Support and Make Your Attic Safer
There are some jobs that you won’t be able to safely DIY by yourself, such as moving and modifying the joists. You will need to get permits and some pretty heft equipment. There are a ton of modifications that need to be made, and most “normal DIY-ers” people aren’t equipped to do this.
But the good news is that you can take some steps now to make your attic floor safer if it is ready to go with flooring to finish it. You will want to clean everything thoroughly and ensure the subfloor is secure. Check for any signs of mold, degradation, or infestations. Attics can often have little friends living in them, and you don’t want to have to deal with them when everything is finished.
Consider the Usable Floor Space
Before you decide on the flooring you will add to your attic, you need to think about how much usable space you actually have. Attics usually have pitched ceilings that limit the amount of floor space you have. If you want to make the space seem bigger, you may want to choose a different type of flooring.
Once you have determined how much space you have, you will want to think about exactly what you will use that space for: a living area? Storage? A bonus space for your kids? The room for the litter box? There are just so many options for the space, and those options will dictate the types of flooring you will choose.
Finish Your Attic Flooring for Storage and Light Usage
If you aren’t going to be putting a ton of weight on your flooring, then maybe you just want to finish it so that it looks good and you can safely store your Christmas tree or out-of-season clothing. This is a great option for those who have attic joists that won’t bear a lot of unnecessary weight.
You will be able to install plywood (½ inch) in panels over the existing joists. Then you can finish it with any type of flooring, if you’d like, just be careful about putting weight on it when you try to install everything.
If you want to prevent sagging, use ¾-inch plywood to prevent sagging.
For most people, this is an easy DIY project. Just be sure to test the amount of weight you are putting on the individual pieces. And voila! You’ll have a great new storage space that will free up some valuable space downstairs.
Finish Your Attic Flooring for Livable Space
Have enough room and support in your attic to create more livable space? Great! The time has finally come to finish your attic with flooring. First, you are going to choose the hardwood flooring that you like best. You will want to think through this and weigh your options to make the best choice for your space. Since attics are sometimes a strange shape, you will have to make cuts and take your time.
Remember: always measure twice and cut once. Get your measurements precise and, if possible and in the budget, order more flooring than you need. You will most likely make a few mistakes, so it’s always better to be prepared.
At the very least, measure the longest length of the room and the widest width of the room. Multiply those numbers together, and you will get the amount of flooring you need.
Get the Prep Done
As mentioned above, you want to clean everything thoroughly. Check for any squeaky sections of the subfloor, correct them, and check again. Sweep and vacuum everything right before you are ready to start. You don’t want any dust and debris to get in your way.
Finally, roll and staple the vapor barrier strips. This might seem unnecessary, but it will help you in the long run.
Start Laying the Floor
Next up, you want to lay the flooring. Remove any molding from previous installations and start building your floor about ⅜” away from the baseboards. You want to leave room for the boards to expand and contract with temperature changes, particularly if you don’t have as much control over the temperature in this part of your home. (If this is the case, you probably want water-proof flooring to help with moisture.)
Be sure to use longer boards on the first row because this will help to keep everything straight. You do want to switch up lengths as you move across the floor because it will create a more seamless look. Drilling a pilot hole into the board, be sure to work at 90-degree angles, and use a nail and a nail set.
Keep moving at a quick, steady pace as you go across the flooring.
One thing you want to be sure to do is to drill pilot holes into the tongue of the board and then hand roll the nails. Then, staple the boards so that they sit correctly. Be sure to use the gun lip over the end and then hit it with a mallet.
Final Touches
Finally, you want to fit and cut the baseboards to give your space a finished look. Leave about a foot and cut it off; use the next piece on the next row. This will help you to save money.
Finally, you’ll want to finish cleaning up the dust and fill in your drill and nail holes with nail putty to finish off the flooring.
Voila! Livable (or Storage) Attic Space
All your hard work is sure to pay off. Now you have a ton of extra livable or storage space that you didn’t have before. You can do just what you want with it, and you have beautiful new flooring to make it that much more “homey.” Stunning hardwood flooring can really take a space that wasn’t meant to be seen and elevate it, so it can truly become a usable part of your home.
Sources:
All You Need to Know About Attic Flooring | Bob Vila
How To Measure For a New Floor | Calculator Site
Finishing Your Attic: Flooring Options | Family Handyman
