Let’s set the scene. You’ve been spending a lot of time at home with the pandemic, and you’ve been noticing that you have some big ideas about remodeling your home dancing around in that pretty little head of yours. The flooring is one of the most important, eye-catching parts of your home, and you want it to be able to stand up to the daily wear and tear of your on-the-go lifestyle while still looking amazing.
So, you’ve decided to learn more. After investigating a little bit, you have a fairly good idea about what kind of flooring you want to install, but then your contractor asks you to choose between multiple types of installation methods. Uh oh! They mention something about a floating floor, and you’re picturing something out of a fantasy novel. It’s ok, just take a breath. But what does a floating floor mean in real life? Do you even need a contractor to do the installation?
Floating installation actually involves attaching flooring panels over a cement or tile subfloor without using glue or nails. Sounds interesting enough, now doesn’t it? So, before you give your contractor a thumbs up (or down), let’s discuss how it works, how it’s different from other types of installation, and when it’s appropriate to use floating installation. Ready?
What Is It?
A floating floor refers to the type of installation you use, not the floor itself. There’s no actual floating involved either, unfortunately. It can be used with many different types of materials like luxury vinyl, engineered hardwood, and laminate flooring. Interlocking planks connect to form a single mat of flooring that rests on your subfloor. This is all accomplished without the use of large amounts of glue, messy adhesives, staples, or nails, which saves you a lot of hassle.
Click and lock connection works by giving the planks built-in interlocking systems. The planks actually click and lock when laid down. The planks click together when laid down on the subfloor and snap together, all without any glue. The amazing thing is that floating floor installation can be done on any kind of subfloor. All of that means that even someone without extensive experience could install their own floors. Another awesome way to save money when redoing your floors!
It also means you won’t have to deal with heavy power tools and the mess that inevitably follows them. No need to endlessly measure the planks and saw them down to fit or worrying about getting glue everywhere. This is a home improvement project that is relatively simple and doesn’t result in an enormous mess for you to clean up when you’re finally done if you choose to go the DIY route.
When to Use It
Because the floor is ‘floating’ without anything to hold it down, that means you have to install your flooring over a prepared subfloor. However, it cannot be refinished, so if you’re planning to do that down the line, floating is not the installation method for you. It does make it easier to replace individual planks that might get damaged, and it is much easier to do yourself if you want to save the cost of a professional contractor.
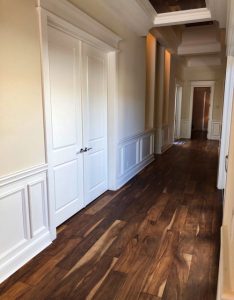
Laminate flooring is almost never nailed or glued down, so it’s a prime example of when to use a floating installation. It allows the floors to expand and contract based on the varying levels of moisture in the environment without buckling. You’ll also see this method commonly used with luxury vinyl flooring, which snaps together in a similar manner. Although less common, you can float engineered wood flooring as well. Though tile and solid hardwood can’t be laid through the floating method, you still have a ton of options to choose from after you’ve decided that floating flooring is the way to go.
DIY Tips
In a floating installation, it’s important to remember to maintain a 1/2 inch expansion gap around the perimeter of the room when installing click and lock planks. When installing tongue and groove planks, you only need a 3/8-inch gap. You need to keep that gap to allow for your wood flooring to expand and contract as moisture levels in your home change. You can use spacers to keep the gap in place during installation.
You should also always check your flooring before you start the installation process for any imperfections that might prevent the edges of the planks from locking properly and forming a tight seam. Clean off the grooves and locks to make sure dust and splinters won’t prevent you from laying the floor.
You shouldn’t have to make many (if any) cuts to the flooring, but if you’re going to use power tools, you should always take the safety measures recommended by the manufacturers and read the instructions carefully. Use eye protection when operating any kind of power tool. If you’re making cuts, it’s recommended to do it somewhere else to prevent the sawdust from getting into the installation site.
When cutting around something tricky, like a door jamb, you can make a cutting template out of stiff cardboard first. You can also use a sharp chisel or utility knife to shave away the bottom of a plank’s groove to allow the pieces to lock properly.
Allow yourself at least two days for the installation, depending on your level of skill. It’s also important to use an underlayment, which is a thin foam padding that can help fix some of the small numbers of uneven places in your subfloor. If you have too many, underlayment can be easily cut with a utility knife to make sure you have the perfect fit. You can tape down the underlayment to create a moisture barrier for your flooring to ward off anything like mold or mildew seeping in from below.
When gluing during tongue and groove installation, put the small amount of glue on the top of the groove, and let the glue fill the entire groove for a snug fit. If any glue squeezes out between the seams, let it dry for at least 10 minutes, then scrape it off with a putty knife and clean the area with a damp cloth before the glue has a chance to finish drying.
It’s also important to note that with a floating installation, only the end seams within the first and last rows need to be glued. Make sure you heat the site before installing it to get rid of excess moisture in the environment as well. Also, use a rubber mallet to gently tap pieces into place and, after they have all been placed, go over the floor again with the mallet to make sure everything fits snugly and won’t be moving around.
If you discover later that your flooring isn’t perfectly straight, don’t worry. Floor molding and trim can cover small imperfections and gaps between the floor and the wall. You might say trim covers a multitude of sins and isn’t hard to install yourself. Thank goodness!
In Summary
Floating installation is an inexpensive, easy method to achieve your flooring dreams in your home. With time and a little patience, you can perform this installation with all of the skill of a professional. You can use this method with a variety of flooring types, so you don’t have to worry about feeling constrained. Just imagine – you too can feel like a wizard with your floating floors!
Sources
https://www.thespruce.com/what-is-a-floating-floor-1821740
https://www.diynetwork.com/how-to/rooms-and-spaces/floors/how-to-install-a-laminate-floating-floor
https://www.thisoldhouse.com/flooring/21017139/how-to-lay-a-floating-floor
