We have a solution if you are thinking about redoing your floors, but you don’t have a new floor in your budget. If you have a little bit of elbow grease, some patience, and a tiny bit of DIY know-how, then you can create a stenciled pattern on virtually any sort of flooring and update your floors for a lot less money.
Stencils are so important to the success of this project because they will literally make or break the design of your new flooring. But luckily, there are some easy tips and tricks to ensure that you have the perfect stencil and use it just the right way to get the job done.
What Floor Can I Not Stencil?
As previously stated, you can stencil virtually any type of floor to give it an updated look without going all out and completely replacing the floor. The only kind of flooring that it is not recommended that you attempt to stencil is carpeting (obviously).
We’re sure there are some real DIY kings and queens out there who will disagree because they have found a way to do it, but we’re going to say carpet is the only no-go for now. Seriously, this is not a time to go rogue.
Talk to Me About the Stencil
The stencil is the key to your new flooring project’s success, so we will spend a bit of time going over the importance of using the right stencil for the job.
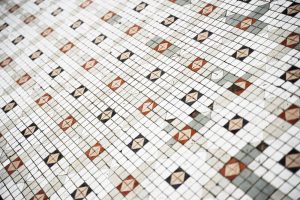
Stenciling a Tile Floor
If you plan to stencil a tile floor, you can make your floor look super spiffy and expensive by simply choosing the right stencil.
By making sure you opt for a stencil that is the same size as the tile, you can make it look like the tile was bought that way, provided you paint it carefully.
Stenciling Tips for Other Floors
Any pre-made stencil can work great for any type of floor, but here are some tips that will help you take the pain out of stenciling your floors.
- Choosing a big stencil will be best. The suggested size is at least 20”x 20.”
- The pattern should be large and should be able to line up when moved.
- There should be enough detail in the design that you can camouflage any flooring dings.
DIY Stencils
If you cannot find a pre-made stencil that suits your fancy, there are other options out there for you to make your own if you are ambitious enough. You can make your own stencil by:
- Finding a pattern online, printing it out, and cutting it out of a mylar sheet using an Exacto knife.
- Drawing it up or cutting it out of cardboard or paper.
- Make sure to laminate the paper, if possible, to keep the paint from soaking into the material.
- Use painter’s tape to make simple geometric patterns or lines on the floor.
What Comes After You Pick Out Your Stencil?
To ensure that your project is a success, you must ensure that your stencil is working for you. Things you need to do to make sure that happens include:
- Before you begin to stencil, you must make sure that the floor is prepared correctly. This includes:
- Sanding
- Cleaning
- Priming
- Choosing the correct paint for your type of flooring
- Measure your floor to locate the middle. That is where you will begin to stencil. You want to work from the inside out.
- Map out your path, so you end up at the doorway out of the room, and you are not literally painted into a corner. This is not a fun predicament to be in.
- Make sure that your stencil is firmly taped to the ground to prevent bleeding with the paint.
- If you used paper rather than cardboard to make your stencil, tape rulers down around it to hold it in place to prevent bleeding.
- You can also use a light spray adhesive to hold the stencil in place to prevent bleeding.
- Know the right type of utensil to get the paint on your type of floor.
- For simple lines or shapes, you can use a paint roller. This will probably work best if you used tape to make your stencil.
- If your design is more intricate, you may want to use stipple brushes, starting in the middle of the stencil and working your way out so that by the time you reach the edge, the area that the paint is most likely to bleed through, you will have less paint on the brush.
- If you are using multiple colors of paint, make sure you know what paint goes where on your stencil. You don’t want to paint the design incorrectly.
Can You Stencil Anywhere?
Absolutely! This same technique for floor stenciling can be used outside on the concrete or on a wooden or tiled surface. Again, as long as the surface is solid, this is a solid technique to use to spruce up a floor anywhere.
While cleaning a surface prior to stenciling will obviously be more complex, it is absolutely just as important as cleaning the surface on the inside of the house. If there is dirt and debris on the surface before applying the paint, then your paint could have trouble sticking.
Additionally, if the surface is dirty, then the odds of your stencils adhering properly are not good, and your paint or stain will probably bleed through, causing your project to turn out less than stellar.
Use the Stencil as an Accent
If you would like to use the same stencil to put accents around the room, such as on the walls or on other objects that will help tie the room altogether, go for it! If you used multiple colors of paint, try transposing the colors in the accent pieces to offer a bit of contrast.
While you don’t want to overdo it with any stencil pattern, putting just a touch of the pattern here or there in the room will add a nice touch to the place and allow you to flex your creative DIY muscles.
Stencils and Style
If you want to come up with an inexpensive way to change up virtually any type of flooring under the sun...or your roof...stenciling is the way to go.
Though the project may be time-consuming and a little tedious, you will be more than pleased with your results, provided that you make sure that you have control of the stencil throughout the entirety of the project.
Another great thing about this project is that if you can’t find the perfect stencil for your taste at the store, there are multiple options available to make a custom stencil that is perfect for you.
You can create your own out of something as simple as making geometric shapes out of painter’s tape, or you can get fancy and print something off, trace it onto something, cut it out, then make sure that your material is strong enough to hold paint.
Whatever route you decide to take for your floor stencil project, if you follow a few simple procedures, remain patient, and put a little elbow grease in it, you will no doubt come out with a floor that you will be in awe of. And your proudest moment? Knowing that you created this flooring masterpiece yourself!
But be careful; if you do TOO good of a job, all of your friends are going to want you to help them stencil their floors so that theirs look just as impressive as yours.
Sources:
How to Stencil a Pattern on a Floor | This Old House
Homeowner makes homemade DIY stencil to paint floor tiles | Ideal Home
