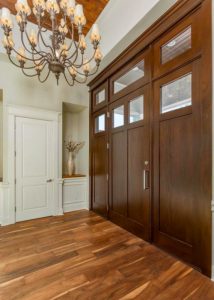
With stay-at-home orders in place for the pandemic, you may be walking from room to room in your home and starting to entertain some big ideas about remodeling your home. Obviously, the flooring of your home is one of the most important, eye-catching elements of the entire house, and you want it to be able to stand up to the daily wear and tear of life while still looking absolutely amazing.
So, with all this extra time on your hands, are you thinking about installing hardwood floors to give your home the ultimate facelift you’ve been dreaming of? Well, if so, you’re in luck because we’re going to lay out some of your best options for hardwood flooring and how to install them yourself if you’re a DIYer. So, listen up!
Selecting Flooring that Fits
There are so many species of hardwood to choose from that it’s hard to know where to begin. Should you go for hickory or birch? What works best when you have high traffic levels? What about pets? What’s the difference between solid hardwood and engineered hardwood floorings? Luckily, you are not the only homeowner asking these questions. There are plenty of blogs out there, giving great examples of some amazing types of flooring to consider for your next project, but let’s list a couple of attributes you should take into account before committing to any hardwood.
For all of you out there who are worried about pets or kids damaging your beautiful new floors, we have great news. There is actually a scale that measures the hardness of each species of tree and the planks milled from them. This doesn’t mean that your floors will be impervious to all dents and scratches, just that it takes a little more to cause them in the first place. The Janka Hardness test measures the hardness and durability of hardwood flooring, using a small steel ball and various planks of wood. This information is invaluable when selecting your hardwood floors. The hardest woods are eucalyptus and strand-woven bamboo, just for a couple of examples, as opposed to birch or walnut, which are much softer options for low-traffic areas.
Solid hardwood is just that: a plank milled from a tree made entirely of that wood. Most planks are about 3/4 of an inch thick and come in all of the amazing colors, shades, and patterns we see in nature. Obviously, the durability and hardness of each type of hardwood depend on the species you choose and its finish.
Another aspect of flooring that you’ll have to consider is cost. As you probably already know, engineered hardwood is often a little easier on the budget than solid hardwood. On average, engineered wood floors are priced at around $3.39/square foot, but premier versions can spike up to $14/square foot. For solid hardwood, you’re looking more at a range of $8-15/square foot. So, if you love the gorgeous shine of hardwoods but need a budget-friendly option, engineered hardwood floors are definitely the way to go!
Let’s take a look at this premium yet affordable option. Engineered hardwood is actual wood that's been laid on a plywood under layer. You might also see high-density fiberboard as a base as well. That base keeps the wood stable and stops it from changing size as the years go by. While engineered hardwood had the reputation of being a poor imitation of solid hardwood before, this is no longer the case. Many advances in both the product and process to make engineered hardwood have catapulted it to premium flooring status in the past few years.
While both solid hardwood and engineered hardwood are both great options for your flooring needs, there are obviously some differences. Solid wood can be sanded and refinished many more times than engineered hardwood to restore its finish and shine. However, while solid hardwoods can last up to 100 years if you make maintenance a priority, good quality engineered wood floor can last between 25-30 years, which is also a great flooring life.
Engineered hardwood can also stand up to a little more moisture than solid hardwood can, though neither one is really meant for extremely humid, wet, or moist environments. While a few simple spills or accidents can be cleaned up, excessive moisture can cause your newly laid hardwoods and even some engineered hardwoods to warp and crack soon after installation. So, clearly, this is something you want to avoid at all costs.
Installation
Now, the fun part! You have some basic types of installation to choose from, depending on what you want and the flooring you’ve chosen. Glue down, floating, and staple down installations work well for engineered hardwood. Nail down is the most permanent method and is used for solid hardwood, although it does require a wooden subfloor, which can increase the cost of your remodel if you don’t already have one.
Floating installation is the most common installation method for engineered hardwood, which involves attaching the panels over a cement or tile subfloor. We’ve included a step by step guide for installing nail down and staple down engineered hardwood, just as an example, below.
Always allow your new flooring to adjust to your home’s humidity by letting it sit for a few days. This is crucial, as this step will help prevent your hardwood planks from warping and cracking with the natural moisture in the air. Just don’t let it sit in your basement, where it might absorb any extra wetness. When you begin installing your flooring, typically, you’ll need:
• Jigsaw
• Basic saw
• Tape measure
• Miter saw
• Builders felt or tar paper
• Straight edge
• Rubber mallet
• Flooring stapler or nail gun
First, make certain that the concrete slab has been cleaned and is level. You can use a sander to smooth out the surface so that nowhere changes more than 3/16”. It is crucial that the slab is flat under your flooring. Then, undercut door jambs casings. You do that by putting a small piece of flooring before the casing and saw through so the planks can slip under. Make sure to do that around all of the doorways.
Then, put out your builders felt as a barrier against moisture for your flooring. Staple it down every approximately four feet, and cut it to so it’s within 1/2 inches of your walls. Make sure the floor is flat and the staples are firmly pressed down. Once you’re done, you can start laying your wood. Engineered wood is usually tongue and groove, which means the planks fit together easily. You can also insert 1/2-inch spacers up against the wall to make an expansion gap to stop the wood from cracking and buckling. That will also help later when you install the baseboards.
The nail gun drives a nail through the tongue into the subfloor. Remember, when you install a floor through the nail-down method, the tongue must face out. Then, use a brad nail gun with 1.5 in nails and nail every 6 to 8 inches. You should also nail up to 1” from the wall. Vary the lengths of your planks to make staggering seams, and take note of the tongue alignment while you work. When you’re done, remove the spacers and put in the baseboards. You can fill any nail holes with matching wood putty.
With that, you’ve successfully installed your amazingly beautiful and oh-so-cozy hardwood floors. You should be proud of yourself! Of course, if you’re not very experienced with woodworking or want the security of a professional, you can always hire a contractor to help you pick the best flooring and install it for you. But regardless of who installs it, you can sit back and admire your brand-new hardwoods, which are meant to impress from up close and afar!
Sources
https://www.architecturaldigest.com/story/wood-floors-guide
https://www.thisoldhouse.com/flooring/21017857/all-about-hardwood-floors
