Wood flooring is one of the most popular flooring options out there — for a good reason — but there is something that can worry homeowners: wood flooring visibly shows water damage. Whereas damage from water may hide under carpets or fix easily when replacing a laminate tile, wood floors are a bit harder to repair. But the good news is that it’s not impossible.
If your beautiful wood floors have been damaged due to water spillage, follow these steps to make the repairs, and you’ll be back to loving the floor you’re with in no time.
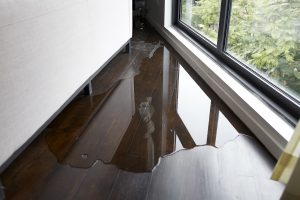
Be Sure To Document the Level of Water Damage
Before you do any repairs, you want to take photos of your water damage and make notes about it. This will help you with any insurance claims. You also want to do some research into the water damage itself, which can help you to prevent the same issue from occurring again and damaging your floors again.
In particular, you want to look for things called cupping and crowning. Cupping is when the edges of the floor have lifted up and are higher on the edge than in the center. This means that the damage occurred from water vapor or direct water coming from under the floor.
The bottom of your floorboards absorbs more moisture, which causes them to expand. The bottom then swells, which makes them curl up.
Crowning, on the other hand, is when the edges go downwards, creating a “hill” in the middle of your boards. This arched look means that there was more moisture on the top of your floor than on the bottom. This could be caused by humidity and moisture, flooding, or even a spilled drink. Be sure to note what happened, so you can avoid it in the future.
Will Repairs Do, Or Do You Need a Full Replacement?
Sometimes, a floor is damaged so much that you simply can’t make repairs and instead need to replace the entire floor. If your moisture content is too high on every board, it doesn’t make sense to repair it. The moisture content of your boards depends on how long it was exposed to water. If a floor is left to dry on its own, or the water sits on the boards for a long time, it’s often best to replace the floor.
Some other situations that cause replacement are:
- Your type of wood flooring
- If there are stains on the floorboard
- If water penetrates the subfloor and needs replacement
- You can’t find a direct match for your hardwood flooring
If there is minor damage to your flooring, then you can most likely save it. If the damage is too much, then you are going to have to replace it. But before you can do either, you have to know what caused the problem.
Figure Out What Caused the Issue
Once again, the biggest thing you need to tackle first is figuring out what caused the water damage to begin with. Most people will know what caused the issue, like a leak in the dishwasher or a flood from a fire, but sometimes the reason isn’t always apparent.
You will need to look for external sources of water, like rain that comes in your home, cracks in the floor, or burst pipes. Internal sources can be appliances, water drips, pets, and even spilled glasses of water.
Find the issue, and fix it before you begin making any repairs. You don’t want to have to redo your work because the issue reoccurs.
Fix Your Water Damaged Wood Floors
The sooner you fix your damaged wood floor, the easier it will be and the better chance you have. First, you want to secure the area and clean up all of the water. You don’t want to introduce any more water while you are working on your floors.
Materials You’ll Need: Buckets, brushes, rubber gloves, fans, shop vacuum, disinfectant, dehumidifier, and replacement flooring
1. Remove Leftover Water
Water can enter your wood floors quickly, but they tend to hold onto that water for a long time. Start by using a shop vacuum to pull as much of the water out of your floorboards as possible. Be sure to use the wet mode to pull the water out of the floor. Go over it a few times to make sure everything is dry. You can use a squeegee to gather the water and then suck it up to make the job that much easier.
2. Clean the Floor
Next, you want to clean and treat the floor so that mold doesn’t form. Use a mild detergent and a disinfectant to avoid mold growth. Be sure to use clean water as much as possible. Use a brush to clean into the grooves of the wood as well.
When using a brush, be sure to constantly wash the brush and remove all of the dirt and grime. Anything you leave behind has the potential to grow mold or mildew.
If you do see visible mold, be sure to clean it with some cleaner that will stop mold growth. Use that same cleaner to scrub the area, rinse it thoroughly with clean water, and then dry the surface as much as possible.
To dry everything out as much as possible after cleaning, use fans, dehumidifiers, and open the windows so that everything thoroughly dries.
3. Sand the Floor
Once everything is dry, you want to sand the floor and prepare everything for repairs. If your floorboards are cupping, use a drum sander to reduce some of the visible cupping. If you have to do this too many times, the boards will wear thin, so try to avoid doing this too much.
If the cupping is too significant, it cannot be sanded flat. Instead, you will want to nail the floorboards back down. Unfortunately, if your floors are cupped too much, you won’t be able to nail them down or sand them. In this case, the only thing you can do is pull up the individual boards and replace them.
4. Stain or Paint
If you have a lot of mold, you will want to restrain and repaint your floors. Painted floors, in particular, are known to encourage mold growth underneath the paint. You will have to strip the paint off the floors and repaint them. Use a cleaner in between paint and wood, and always dry everything out as you go. Do the same thing with your stain.
Fixing Your Wood Floors Is a Snap
Fixing your water-damaged wood floors doesn’t have to be the nightmare it is sometimes portrayed to be. It actually isn’t a difficult process at all if you only have a board or two that is water damaged. However, if almost every board needs fixing or nailing, then you may just want to replace the entire floor for the best results. If your floors are often exposed to moisture, you may benefit from waterproof flooring.
You always want to use the appropriate moisture-reducing tools when you are cleaning your floors and ensure that all spills are thoroughly cleaned. And remember, the sooner you address the problem, the easier it will be to fix.
You should perform routine maintenance, but be sure not to ever put too much water on your floors. If you have water damage, you may want to contact a professional first to help you dry everything out and go from there.
You most likely won’t need their help to fix the floors, but the drying process can be more complicated than it seems. In the end, your wood floors will be restored to their natural beauty, and the water damage will be a headache of the past!
Sources:
Dishwasher Leaking? 5 Parts That Might Be in Need of Repair | Bob Vila
Water in Basement: How to Fix a Leaking, Wet Basement (With Pictures) | Family Handyman
