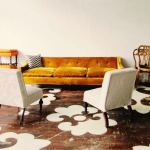
Stenciling and painting wood floors have become a hot new trend in the design world. While we personally love the sheer beauty of natural wood, stenciling or painting your hardwood flooring can add allure and personality to your space.
It is a task that even a relatively new DIYer can do with a bit of patience and the ability to follow some simple directions. This makes it a cost-effective way to add some flair to your floors without having to go all the way and completely redo them.
Below are a few steps to take if you want to add drama to your wood floors at a relatively low price, making stenciling your existing floors a great, budget-friendly option for the creative eye.
Creating a Stencil Out of Cardboard or Tape
You have a few options when it comes to creating a stencil for your floors. One popular method is to create a large stencil out of corrugated cardboard or thick paper and do something as simple as taping rulers around the edges of the material to keep it held in place. Cut out your stencil and laminate it to keep it from absorbing the moisture from the paint.
Modern decorations call for fun, playful shapes. Those ideas can be fun in the bathroom, too, on things like vinyl, as well, so try a couple of designs to find which one tickles your fancy the most. Another popular method is to simply tape off sections of your floor and use that as a stencil. This is a perfect choice for a simple geometric pattern on your floor. Simply place painter’s tape in the shapes you choose, and your stencil is made.
You Have Decided on Your Stencil - Time to Paint?
If only we lived in such a perfect world, right? But no, you can’t just jump into painting quite yet. You can’t even put down the stencil yet. So, what’s the next step? You have to prep the floor before you go any further.
- Sanding your floor to give you a nice, smooth surface to start with.
- Cleaning the floor very well to ensure that there is no dirt or particles leftover from the sanding process
- Put down a couple of layers of primer and allow a day or two for it to dry. Again, this will get you off to a smooth start with your new stenciled floor.
- Making sure that you opt for the correct paint for your floor. Alkyd-based paint is best for high traffic areas.
- Deciding on the correct color scheme for your stenciled floors. As this is not a process that you will want to repeat in a year or so, you want to make sure that you opt for colors that you will be able to live with for quite some time to come.
- Putting the stencil down. If the stencil is not the tape itself, make sure to secure the edges of the stencil down with the painter’s tape. You should have also figured how many different stencils you will need to cover a large portion of your floor. No matter your method, precise measurements are essential for both taping and stencil placement, so your floor stenciling looks uniform.
The Time Has Come
Ok, now it’s time to start painting! The best idea seems to be starting at the center of the room and mapping out a plan of attack where you will paint. You definitely don’t want to paint yourself into a literal corner here. You want to make sure that you end up at the doorway out of the room.
You also want to make sure you know what part of the stencil will be painted with what color prior to starting the job if you will be using multiple colors in the project. You don’t want to get partway complete with the project and realize that your pattern has been painted incorrectly.
Some paint jobs will call for using rollers for application. This will be if the stencil is more of a simple, geometric pattern, probably one that you would have simply used painter’s tape for.
Other, more extensively patterned, multi-colored jobs will probably need the use of stippling brushes. The best method for stencils like these is to start using the first color at the stencil’s center and then work your way out. This will eliminate the excess paint before getting it around the edges, where it is more apt to bleed through.
Once you have finished painting, you are not through, however. Again, when is anything ever that easy?
The Finishing Touches
Now it’s time to hurry up and wait again. You need to allow the new paint a day or two to dry, depending on the temperature and humidity in your home. Once it is thoroughly dry, then comes the final step.
You can use a roller to apply a layer or two of polyurethane on top of your new stenciled floor to seal the deal...and your floor. This ensures that your new stenciled floor will have a beautiful, long life.
Again, it is essential to allow the floor ample time to dry before anyone can walk over it. Otherwise, you are inviting a heartache and will probably have to do some significant touch-ups on your new stenciled design.
What’s the Bottom Line on Stenciling My Floor?
If your floor is in need of new life, but you are not prepared to pay the price for a brand-new floor, then the option of adding a cool, trendy, en vogue stenciled design is an attractive option to give your floor a relatively low-cost facelift.
Also, this is not a job that requires extensive experience. So, provided you have the patience to make sure the job is done correctly, adding a stenciled design to your existing floor is a perfect way to show off your creative ambitions, impressing not just the guests to your home but you, yourself, as well.
Sources:
How to Stencil a Faux Rug on Hardwood Floors | DIY Network
To Paint or Not To Paint.... Wood Floors | Not Just a Housewife
